I attended a demonstration by a fellow artist last week, in which he demonstrated how to create better reference photos for paintings by using Photoshop CS4. I took good notes of the terms he used and searched through my Photoshop Elements 7 that I used. I found I was able to do much the same thing with this program and am happy with how this Notan turned out. A Notan is an improvement to the grayscale photos I used to print to show where the lights and darks are in a photo so I can save the white of the paper in the best spots. In the Notan above, I was able to see if I had the center of interest in the right place and had the darks and lights next to each other to enhance each other. I liked doing this and will continue now that I got it all figured out. My blogger-buddy, Rhonda, did a Notan earlier this year of some Flamingos, I think. It was good to have seen hers develop as the demonstration went on last week because I already had seen the benefit of doing this.

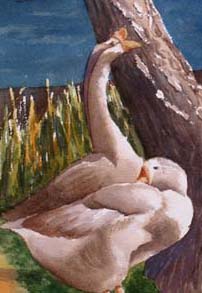
This is the underpainting and first phase of the painting, using the Notan to preserve the lights. As you can see I have covered the lights with green on the grassy area where these birds are standing, but I wanted the lights bouncing off the birds to be the whitest whites of the painting so decided to tone that area down below the birds and go darker when I put in the grass clumps.
I still have to apply quite a bit of modeling shading on both birds, but will finish the water areas, extend that "island" on the upper right past the tree a bit so it doesn't just end behind the tree. Bad move there, compositionally!
Busy weekend ahead, but I will try to work on this more.